Telescope Workshop
Telescope Workshop helps you build an imaging rig before you depend on it in a real plan.
The goal is not simply to add another telescope name to AstroGuide. The goal is to describe the combination you actually image with: the optics, the camera, and any focal-length-changing accessory that sits between them.
That matters because an imaging rig is more than one piece of equipment. A small refractor behaves very differently with a wide camera than it does with a small sensor. A reducer can turn a slower, narrower setup into something wider and faster. A Barlow or extender can make a compact galaxy look larger, but it can also make the system slower and more demanding.
Telescope Workshop gives you a practical way to see those tradeoffs before you save the rig or use it for planning.
What Telescope Workshop Is For
Telescope Workshop is for moments when your setup does not fit neatly into a single built-in smart telescope profile.
You might use it when:
- you image with a telescope and a separate astronomy camera
- you use a camera lens instead of an optical tube
- you switch cameras on the same optics
- you sometimes add a reducer, extender, or Barlow
- you want to compare a possible setup against equipment you already use
- you want AstroGuide's planning tools to understand your real field of view more accurately
The Workshop is meant to help answer a simple set of planning questions:
- how much sky will this rig see?
- will a large nebula fit comfortably?
- will a small galaxy appear large enough to be satisfying?
- is this camera a forgiving match for these optics?
- how does this rig compare with one I already own?
Those answers are planning guidance. Real results still depend on sky conditions, focus, tracking, guiding, filters, processing, sensor behavior, and the choices you make during capture.
Telescope Workshop improves your starting estimate. It does not guarantee the final image.
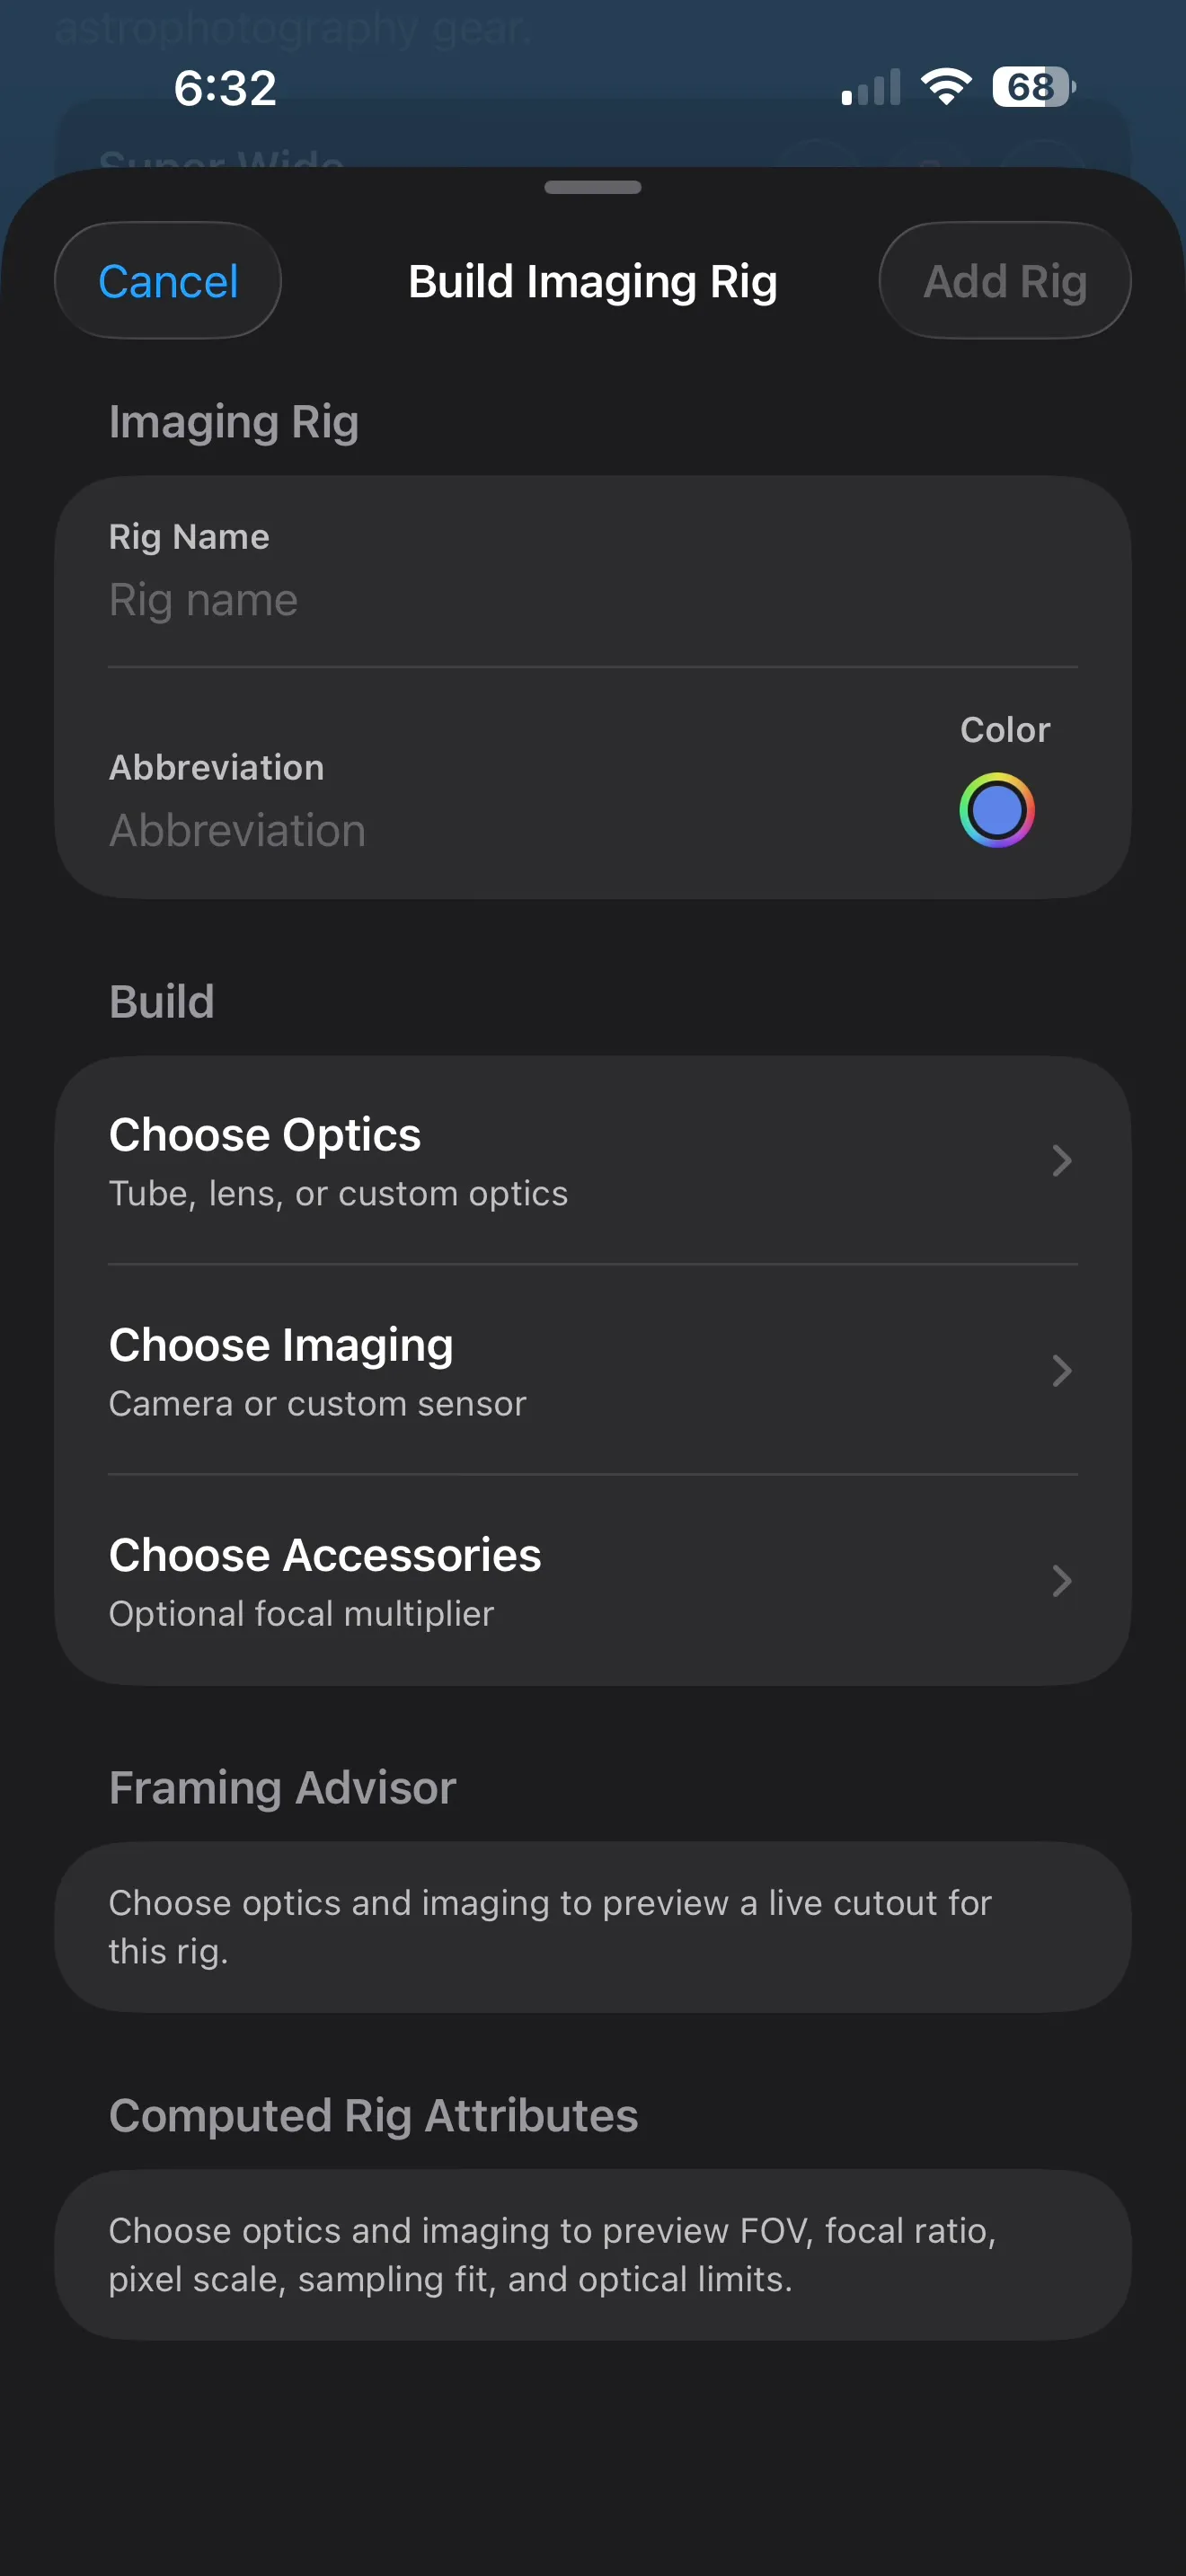
Building An Imaging Rig
A useful imaging rig needs at least two things:
- Optics: an optical tube or camera lens that gathers and focuses light.
- Imaging: a camera or sensor that records the image.
Accessories can modify that basic pairing. The most important accessory in the Workshop is a focal multiplier: a reducer, extender, Barlow, or similar part that changes effective focal length.
AstroGuide combines those pieces into one rig and computes the values that matter most for planning. The app can then use the rig like other equipment: as a field-of-view source, a recommendation input, and a framing reference.
Choosing Optics
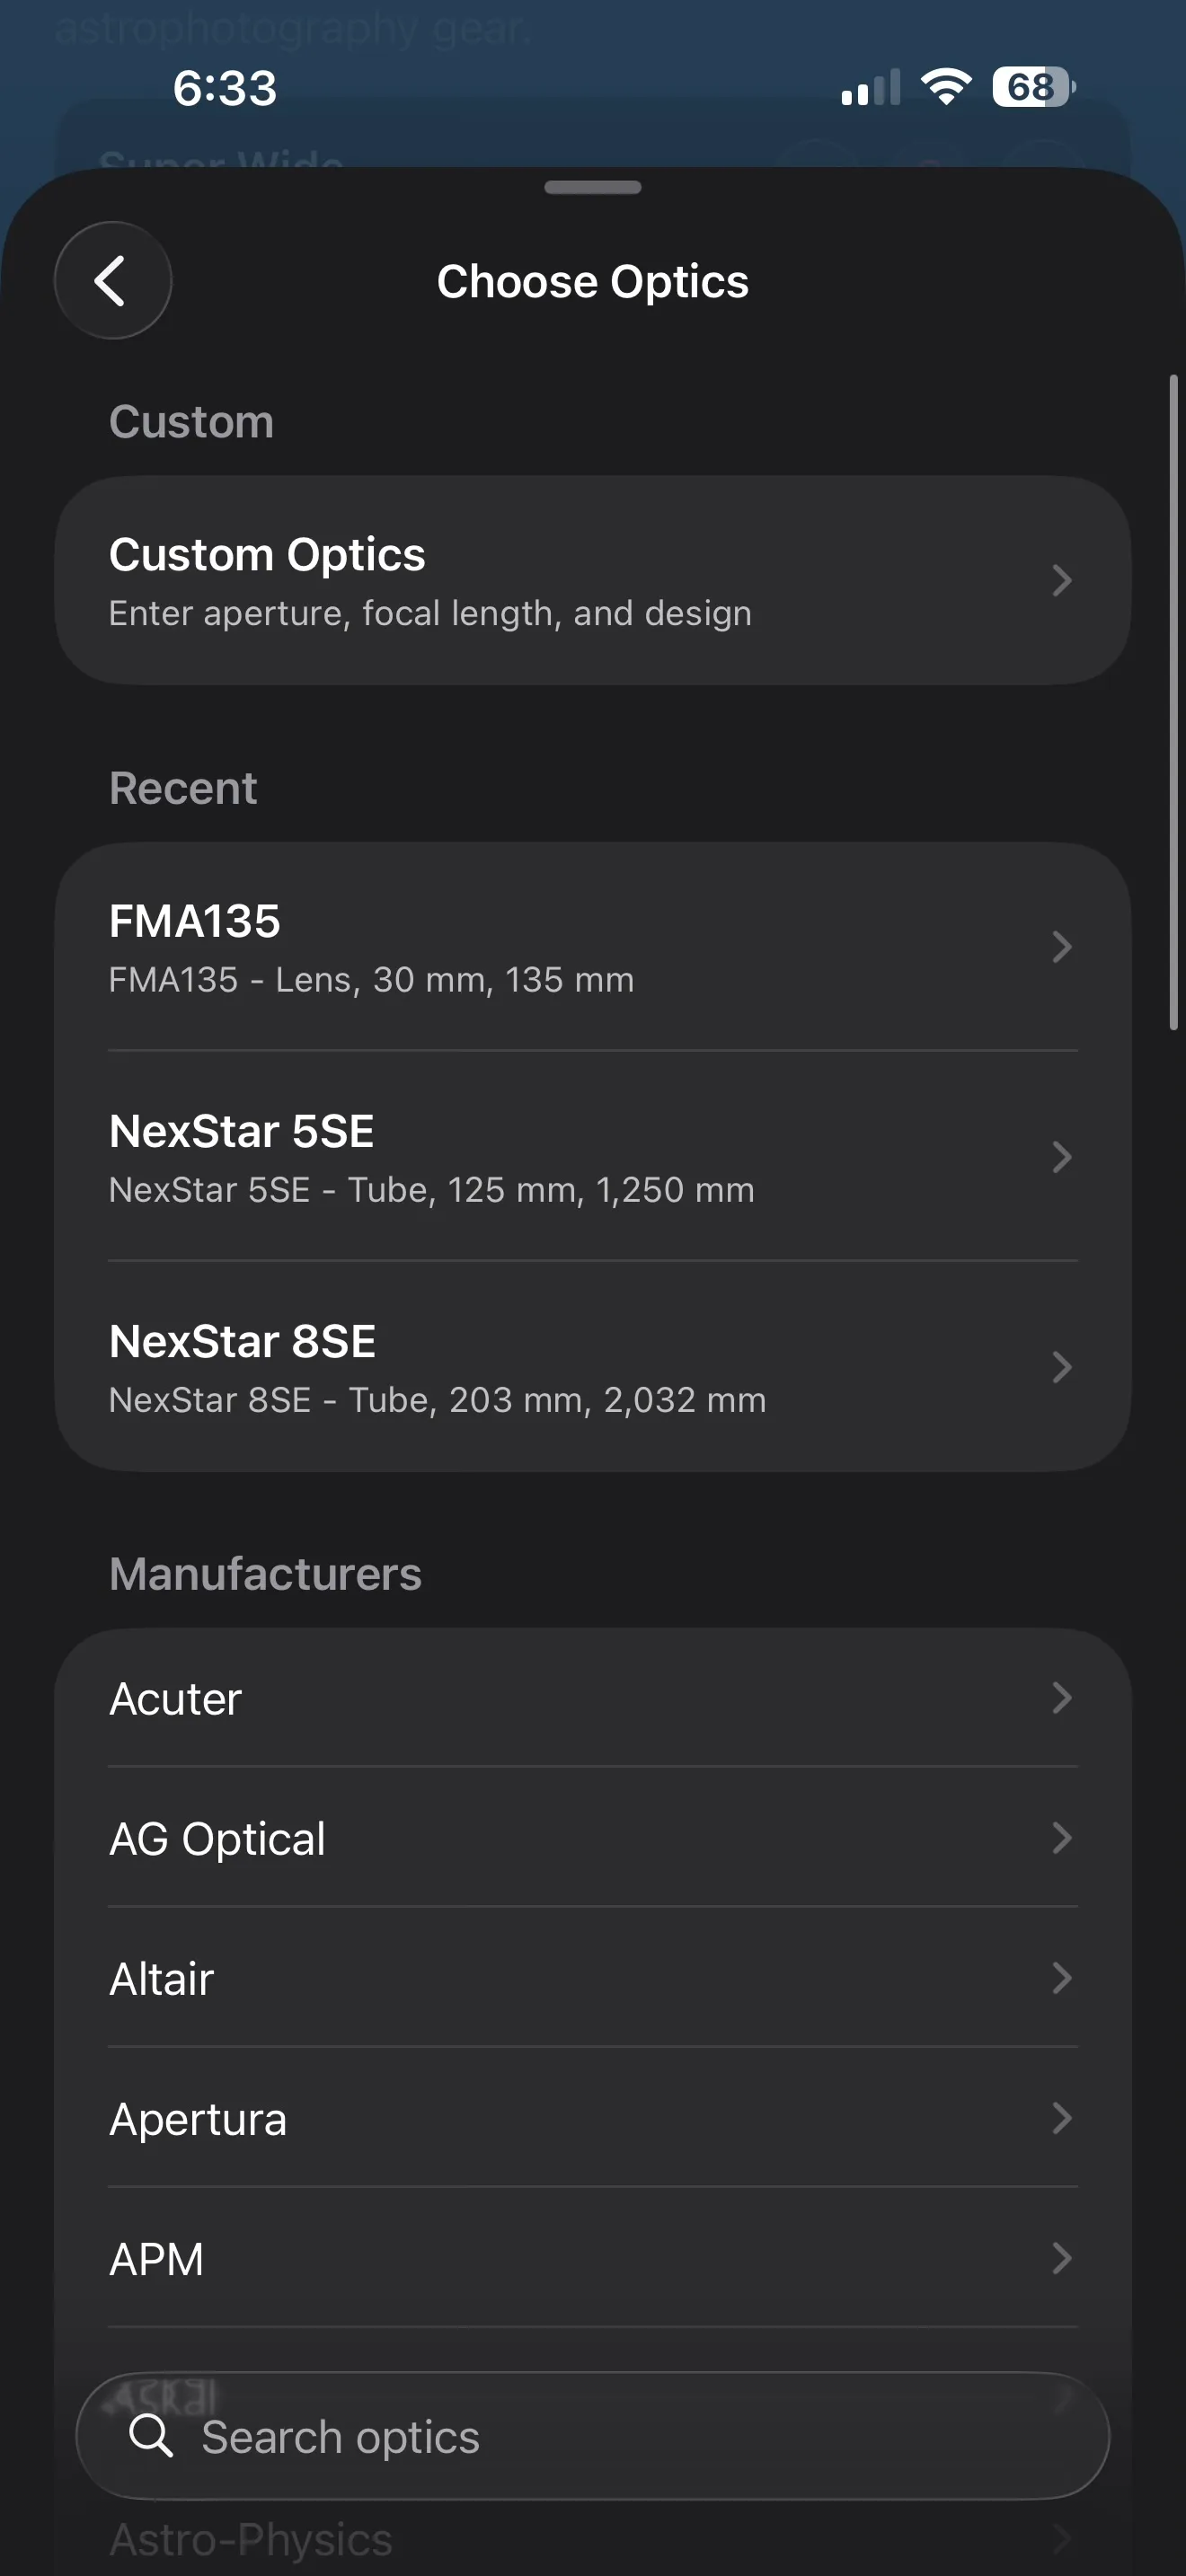
The optics are the light-gathering and focusing part of the rig.
In Telescope Workshop, this can be:
- an optical tube
- a refractor, reflector, SCT, or other telescope design
- a camera lens
- a custom optical setup you enter yourself
For catalog entries, AstroGuide presents the component through navigation-style pickers. You can move from manufacturer to product line to product, which keeps the list manageable even when the catalog contains many options.
When you choose a catalog optic, the fixed technical details are shown compactly. You do not need to edit every field just to use a known product. The important values, such as aperture and native focal length, are already attached to that component.
If your optic is missing, you can use a custom entry instead. A custom optic asks for the required values AstroGuide needs to calculate the rig:
- manufacturer and model, if you want to name them
- tube or lens type
- aperture
- native focal length
- optical design, if known
You do not need to become an optical engineer to use this well. If you know the aperture and focal length from the product page, label on the telescope, or manufacturer specifications, that is usually enough to start.
Choosing Imaging
The imaging component is the camera side of the rig.
This is what turns the focused light into a frame, and it has a major effect on field of view, pixel scale, and how a subject will look inside the rectangle.
Catalog camera entries work like catalog optics. You choose the manufacturer, product line, and product, then AstroGuide shows the known specs in a compact form.
For custom imaging, AstroGuide asks for the values it needs to understand the sensor:
- camera manufacturer and model
- sensor model, if known
- sensor width and height
- pixel size
- resolution width and height
- supported sub-exposure range or supported exposure lengths
- practical maximum magnitude
You do not always need every optional detail for every kind of preview, but more complete camera information gives AstroGuide better derived values. Pixel size and resolution are especially important for pixel scale and sampling fit.
Orientation Matters
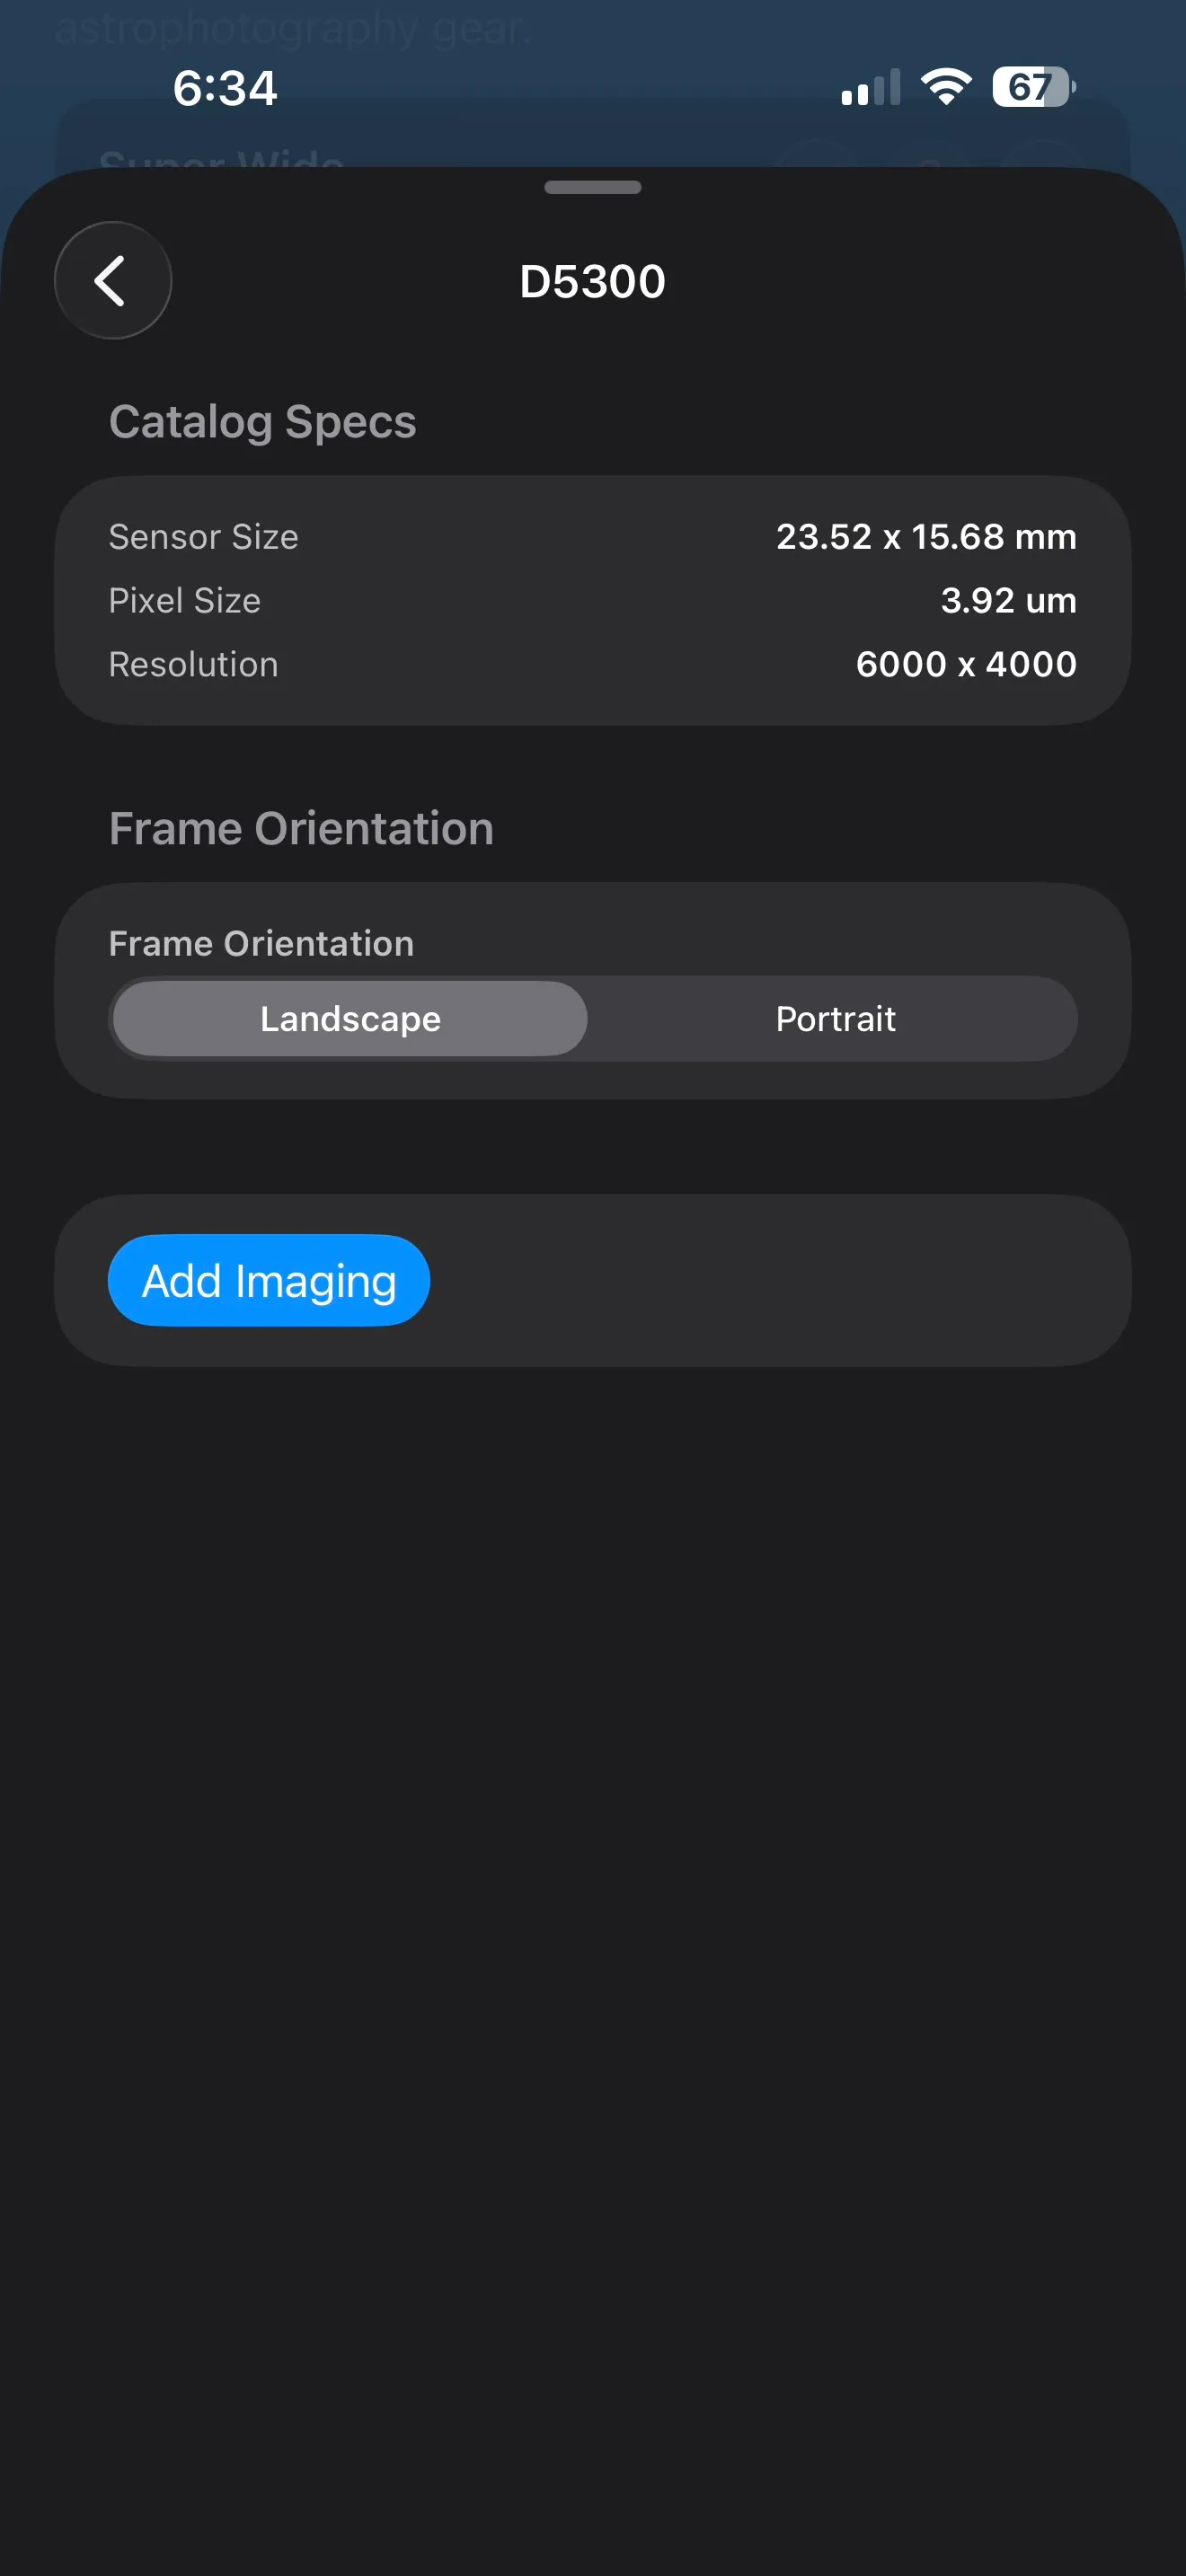
The same camera can frame the sky differently depending on how it is oriented.
Landscape and portrait orientation do not change how much sky the sensor can see overall, but they do change the shape of the rectangle AstroGuide draws over a sky object. That matters when a subject is tall, wide, diagonal, or close to the edge of your frame.
Telescope Workshop lets the imaging component carry that orientation so planning views can show a more realistic framing rectangle.
Accessories And Focal Multipliers
Some accessories change the rig in a way that is too important to ignore.
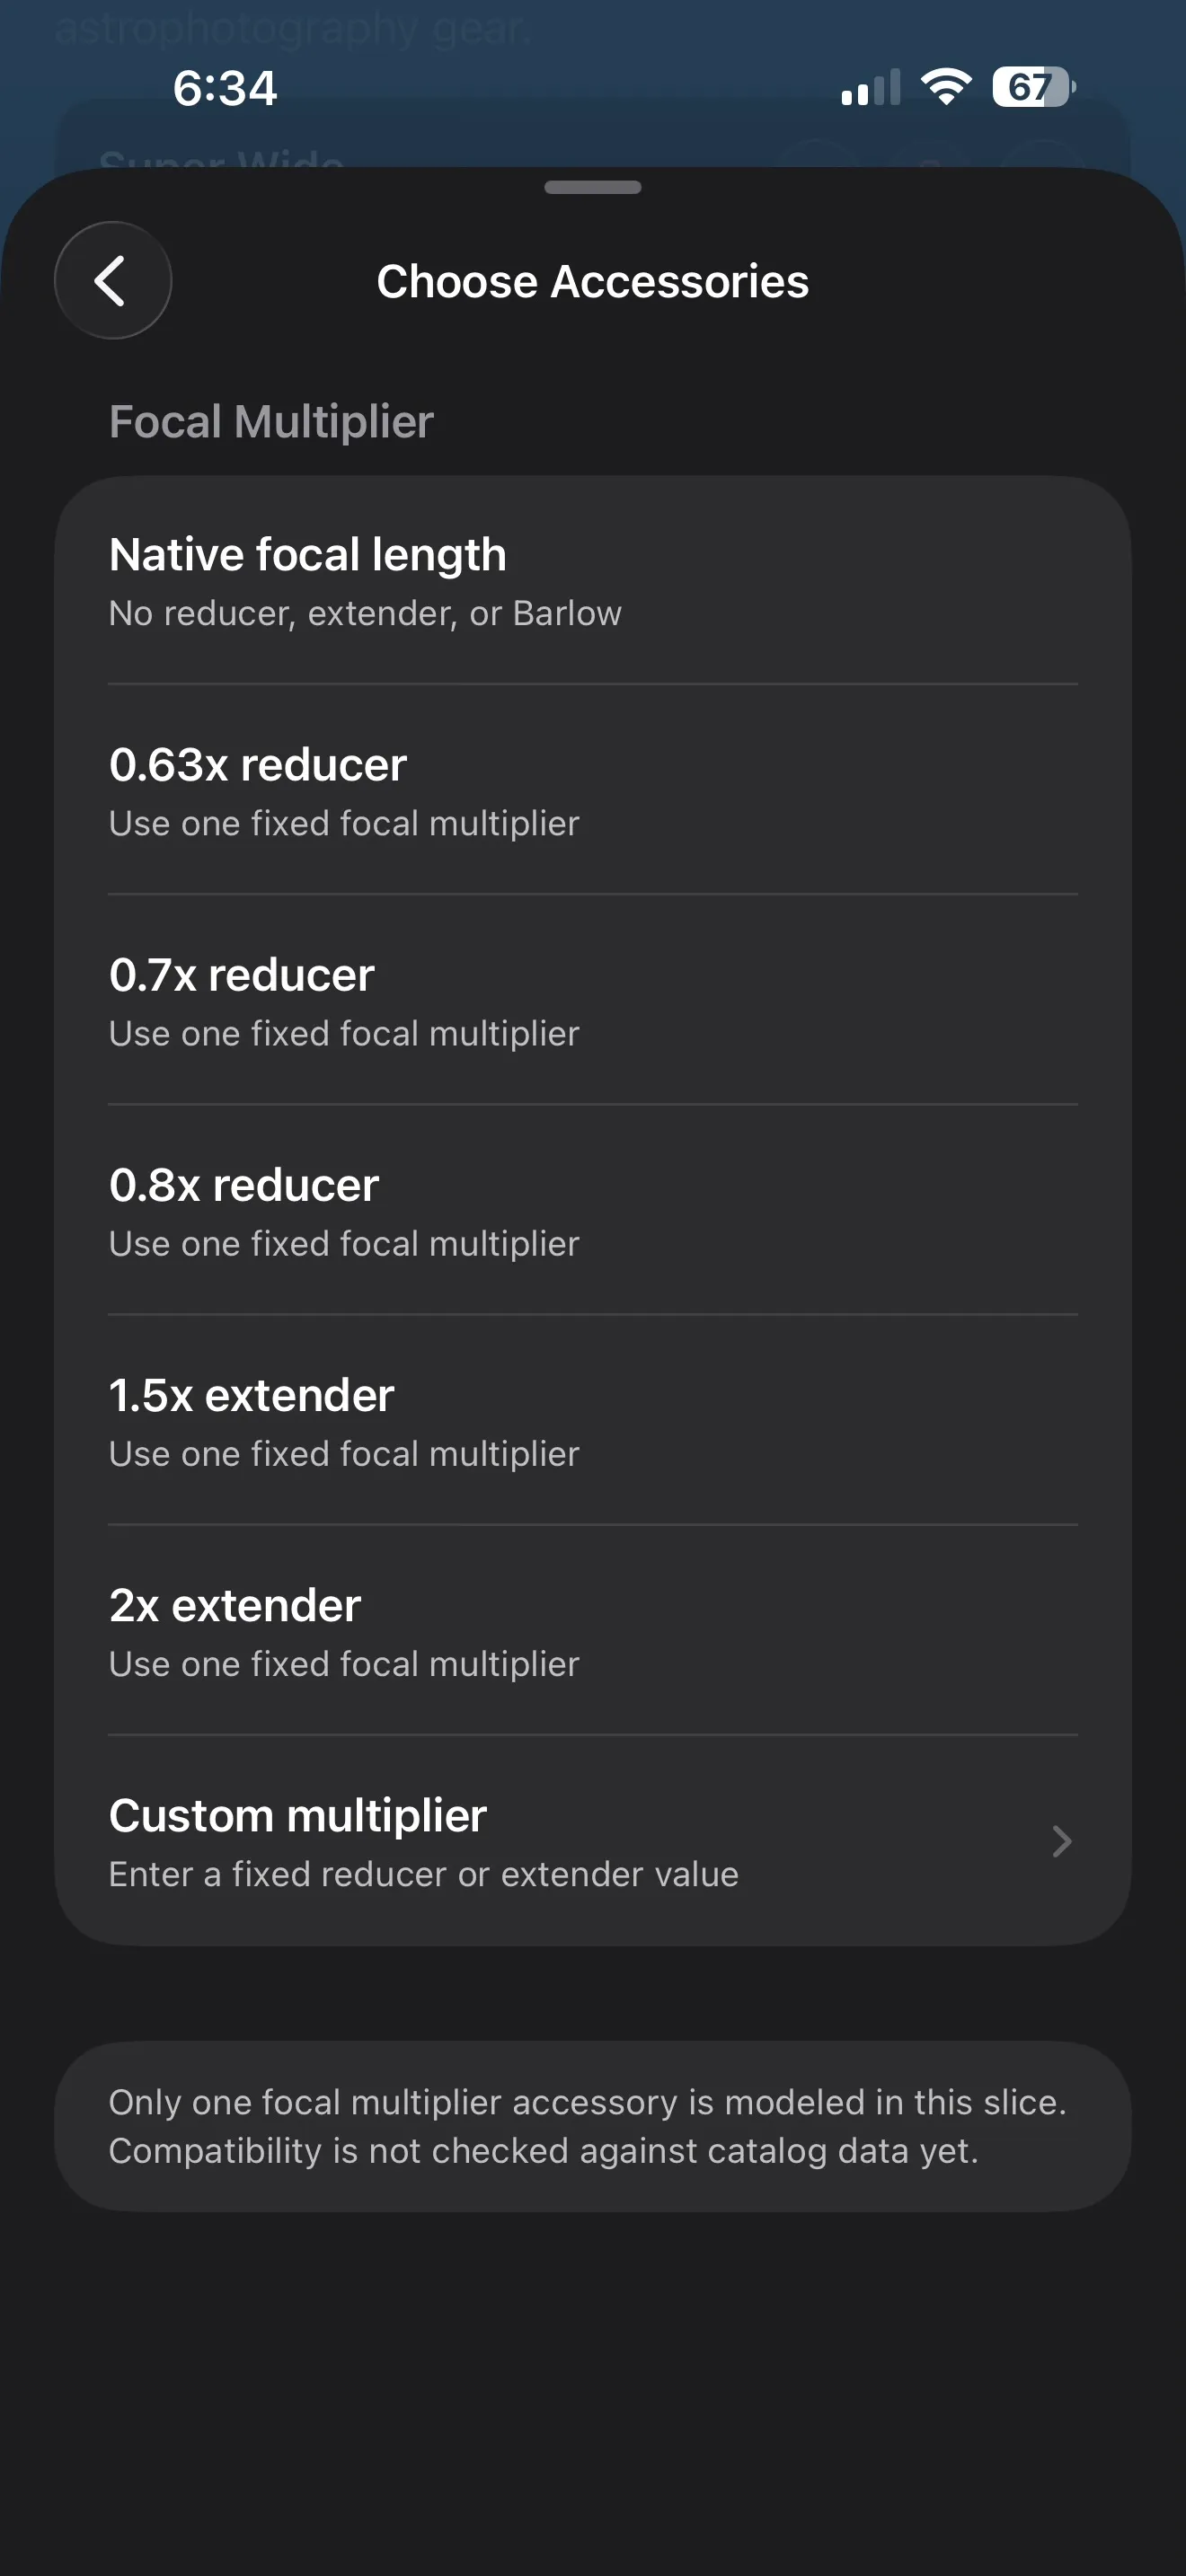
The main example is a focal multiplier:
- a reducer uses a multiplier below
1.0x - an extender or Barlow uses a multiplier above
1.0x - native focal length is effectively
1.0x
A reducer usually makes the rig wider and faster. That can help large nebulae, wide star fields, and forgiving survey-style framing.
An extender or Barlow usually makes the rig narrower and slower. That can help small subjects appear larger, but it also makes tracking, focus, seeing, and total capture time more demanding.
Telescope Workshop models this because the multiplier changes several planning values at once:
- effective focal length
- focal ratio
- field of view
- pixel scale
- sampling fit
The Workshop keeps this simple. It models one focal multiplier accessory at a time, and it does not promise that every accessory is physically compatible with every telescope or camera. Use manufacturer guidance for spacing, backfocus, image circle, and mechanical fit.
Understanding Derived Values
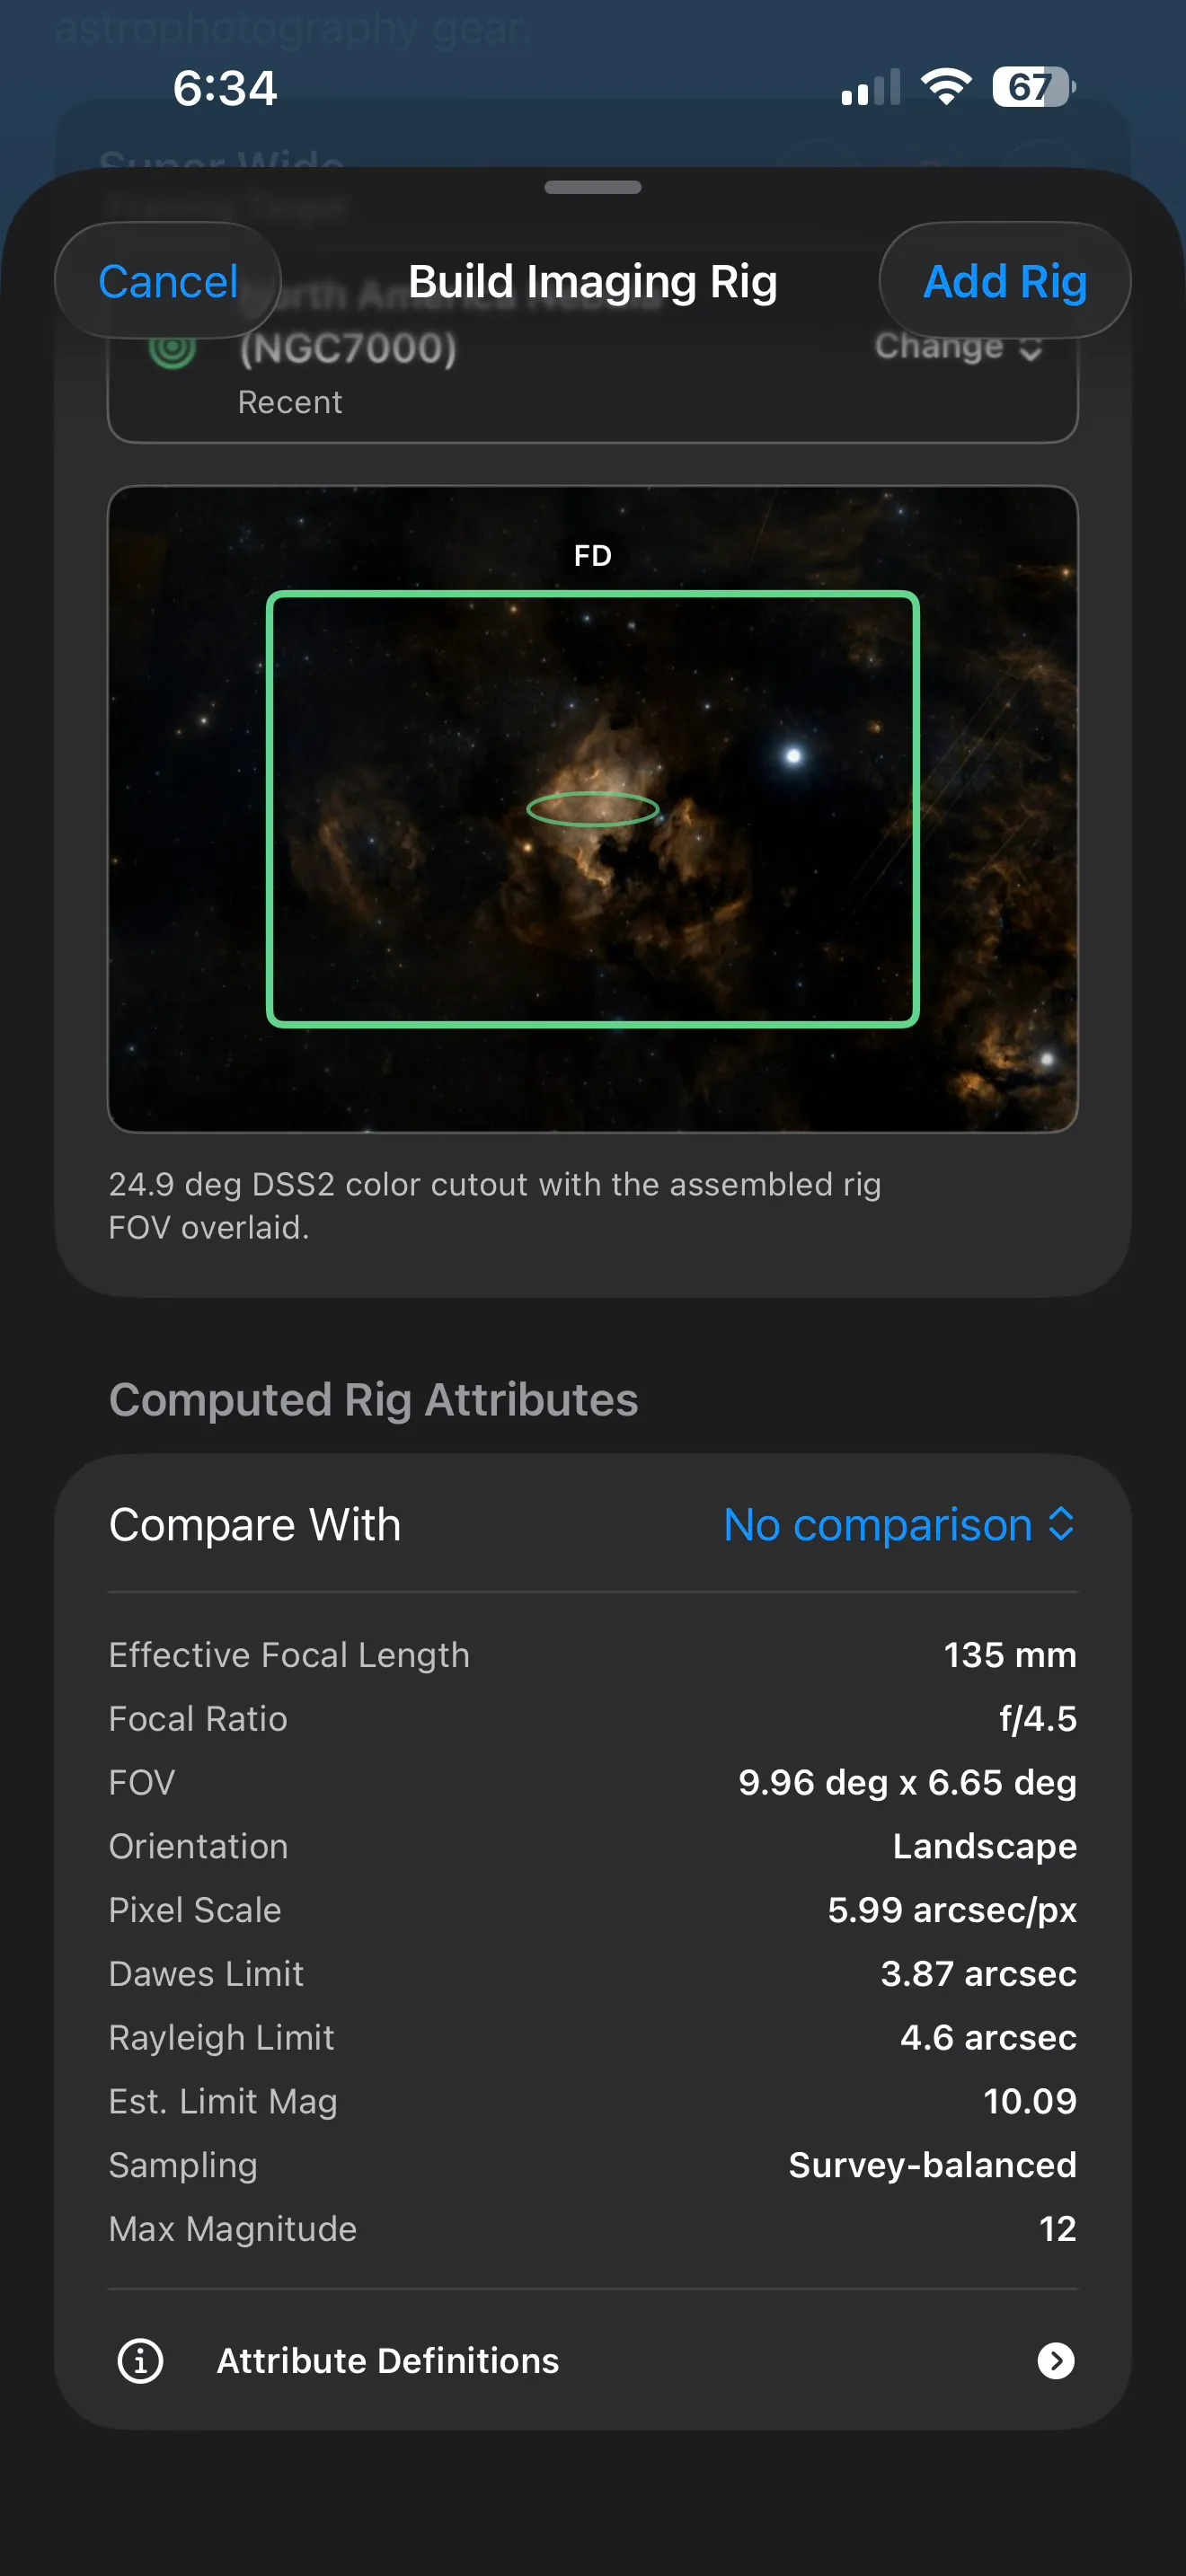
Once the rig has optics and imaging, Telescope Workshop computes a set of planning values.
These values help you move from "I own these parts" to "I understand what this setup is likely to be good at."
Effective Focal Length
Effective focal length is the rig's practical reach after the focal multiplier is applied.
Longer focal lengths make small subjects appear larger. Shorter focal lengths show more sky and make it easier to fit large objects.
Focal Ratio
Focal ratio describes the speed of the optical system.
Smaller f-numbers, such as f/4, are generally faster. Larger f-numbers, such as
f/10, are generally slower. This affects how much total capture time may be needed
for faint detail, although sky brightness, filters, and conditions still matter.
Field Of View
Field of view is how much sky the camera sees with the selected optics.
This is one of the most practical Workshop values. It helps you judge whether a subject will fit, whether it will feel too small, or whether you might want a different camera, optic, reducer, or framing orientation.
Pixel Scale
Pixel scale describes how much sky each camera pixel covers, usually in arcseconds per pixel.
Smaller numbers can record finer detail, but they ask more from focus, tracking, guiding, and atmospheric seeing. Larger numbers are more forgiving and often work well for wider views.
Dawes And Rayleigh Limits
Dawes and Rayleigh limits are rough theoretical resolution limits based on aperture.
They are useful for understanding what the optics might separate under good conditions. They are not a promise that every night, mount, camera, or capture run will reach that level of detail.
Estimated Limiting Magnitude
Estimated limiting magnitude is a planning estimate for faint-object reach.
Higher magnitude numbers are fainter. A rig with stronger faint-object reach may make dimmer subjects more realistic, but the sky background, total integration time, filters, and capture quality still strongly influence the final result.
Sampling Fit
Sampling fit summarizes whether the camera pixels are a practical match for the optics.
AstroGuide may describe a rig as:
- Portfolio-ready when the sampling is fine enough for small detail if the rest of the system and atmosphere cooperate.
- Survey-balanced when the sampling is efficient and forgiving for broad subject coverage.
- Resolution-limited when the pixels are coarser than the optics can theoretically support, which may still be useful for wide framing.
None of these labels are moral judgments. They are planning hints. A forgiving wide-field rig can be exactly the right tool for many beautiful subjects.
Comparing Rigs
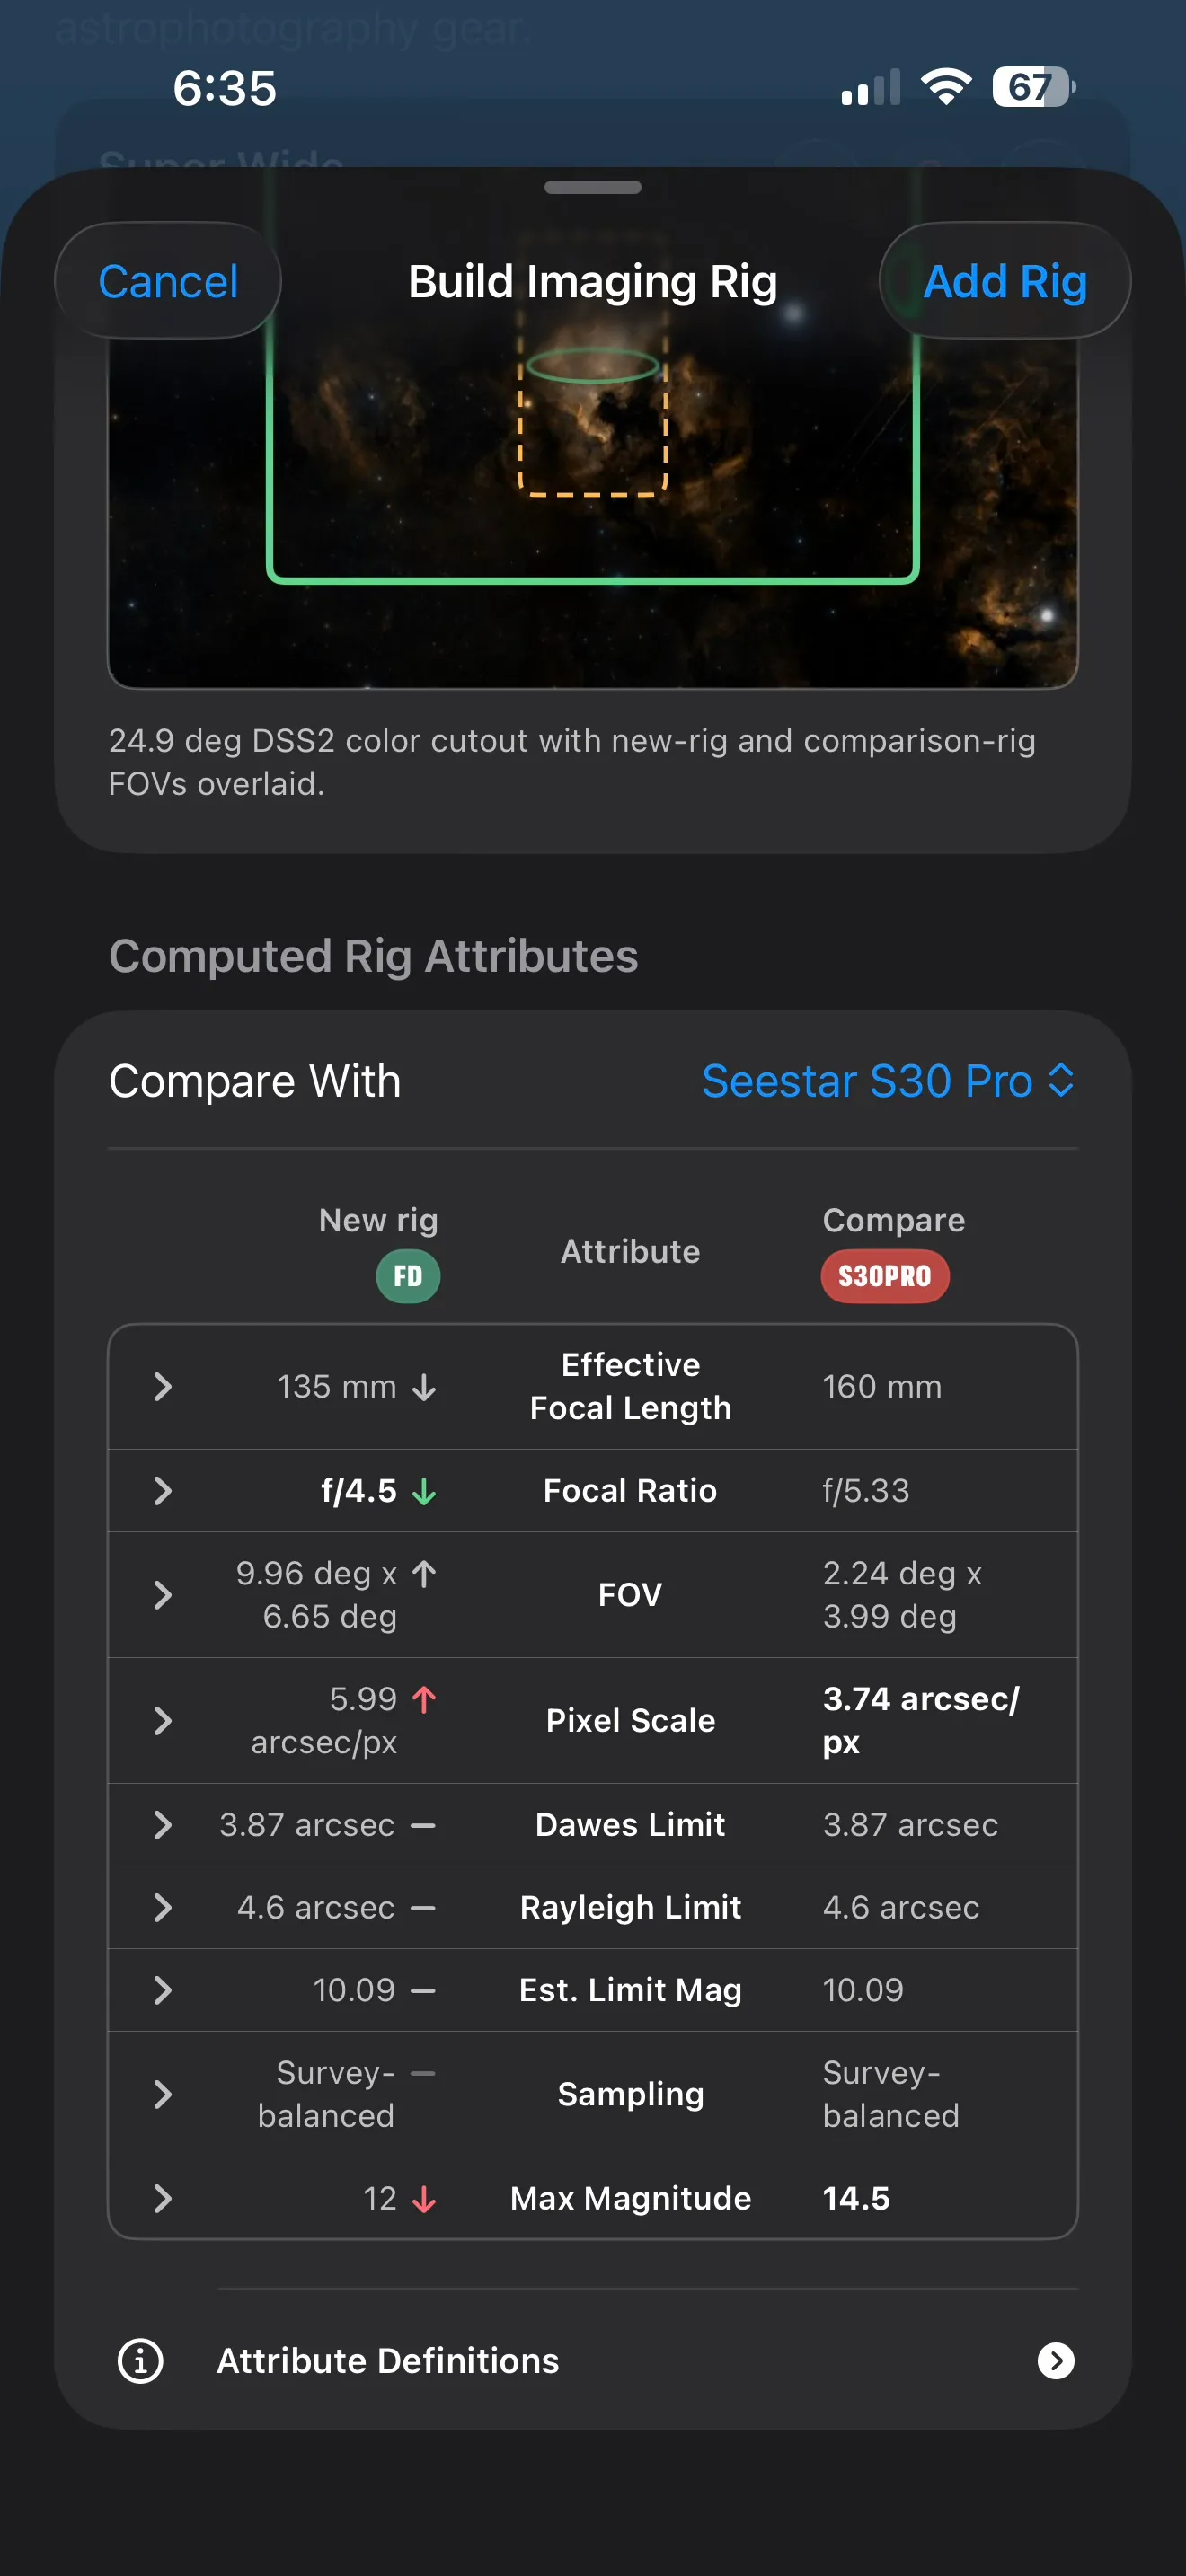
Telescope Workshop can compare a newly built rig with equipment you already have.
This is meant to be practical, not abstract. Instead of asking whether one rig is "better," the comparison asks how they behave differently.
A useful comparison might show:
- which rig sees more sky
- which rig gives a small subject more apparent size
- which rig is faster
- which rig has finer or coarser pixel scale
- which rig has a stronger theoretical resolution limit
- which rig may reach fainter objects by the stored estimate
This kind of tale-of-the-tape comparison is especially helpful when you are deciding whether a new rig fills a real gap. You may discover that it overlaps heavily with an existing smart telescope, or that it gives you a genuinely different field of view.
Comparison rows can also explain what the numbers mean. That makes the feature useful even when you are still learning the vocabulary.
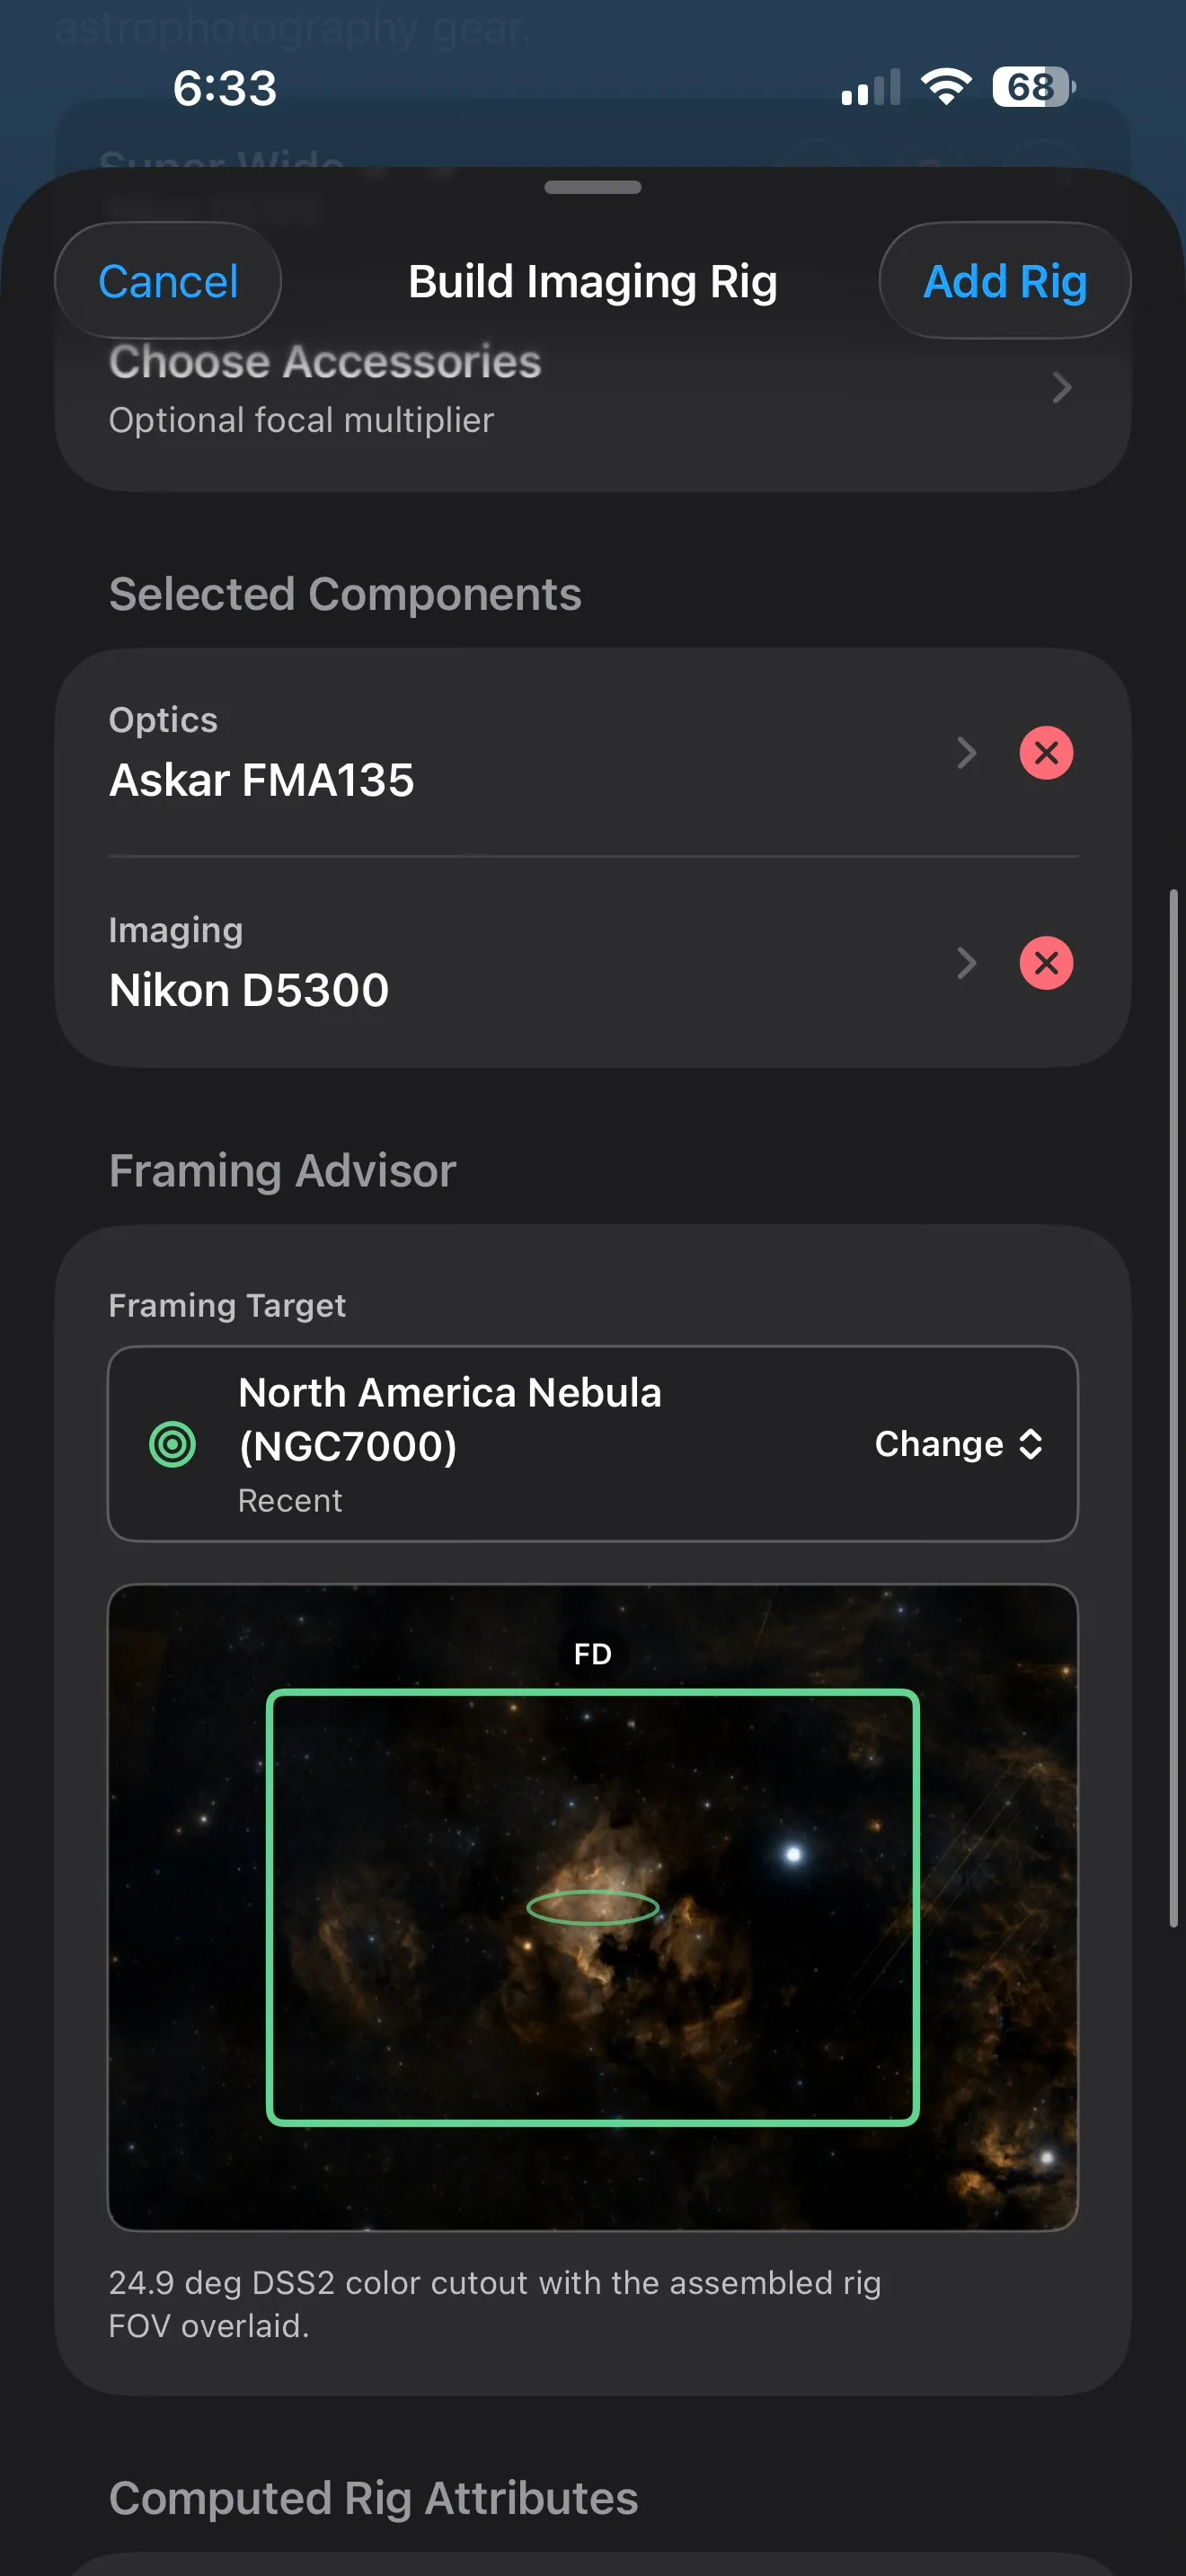
Framing A Sky Object
Numbers are helpful, but a rectangle over the sky is often easier to understand.
Telescope Workshop can use recent or scheduled subjects as framing examples. When the rig is complete, AstroGuide can show a preview cutout with the assembled rig's field-of-view rectangle over the subject.
If you are comparing against another rig, the preview can show both rectangles. That makes size and orientation differences much easier to see than a table alone.
Use this preview to ask practical questions:
- does the subject fit comfortably?
- is there room around it for context?
- does portrait or landscape orientation feel better?
- would a reducer make this subject easier?
- would a longer focal length make it more satisfying?
The preview is still an estimate. Survey imagery, framing rectangles, and catalog geometry help you plan with more confidence, but your final image depends on the real capture.
How Workshop Connects To Planning
The value of Telescope Workshop grows when the rig becomes part of the rest of AstroGuide.
After a rig is saved, AstroGuide can use its computed field of view and equipment details in places such as:
- active equipment
- subject sizing and recommendations
- Search Explore framing
- Path Preview framing
- Capture Studio composition and framing
- future capture guidance
That means the Workshop is not just a calculator. It is a way to teach AstroGuide what your real setup can do.
The long-term goal is for a Workshop-created rig to behave like other equipment in planning views. You should not need to re-enter the same optical and camera details every time you plan a subject.
Custom Components And The Pro Saving Boundary
Telescope Workshop is designed to be useful even when the catalog is incomplete.
If AstroGuide does not include your exact optic or camera yet, custom components give you a fallback. You can enter the required values, preview the rig, and understand the likely planning behavior without waiting for a catalog update.
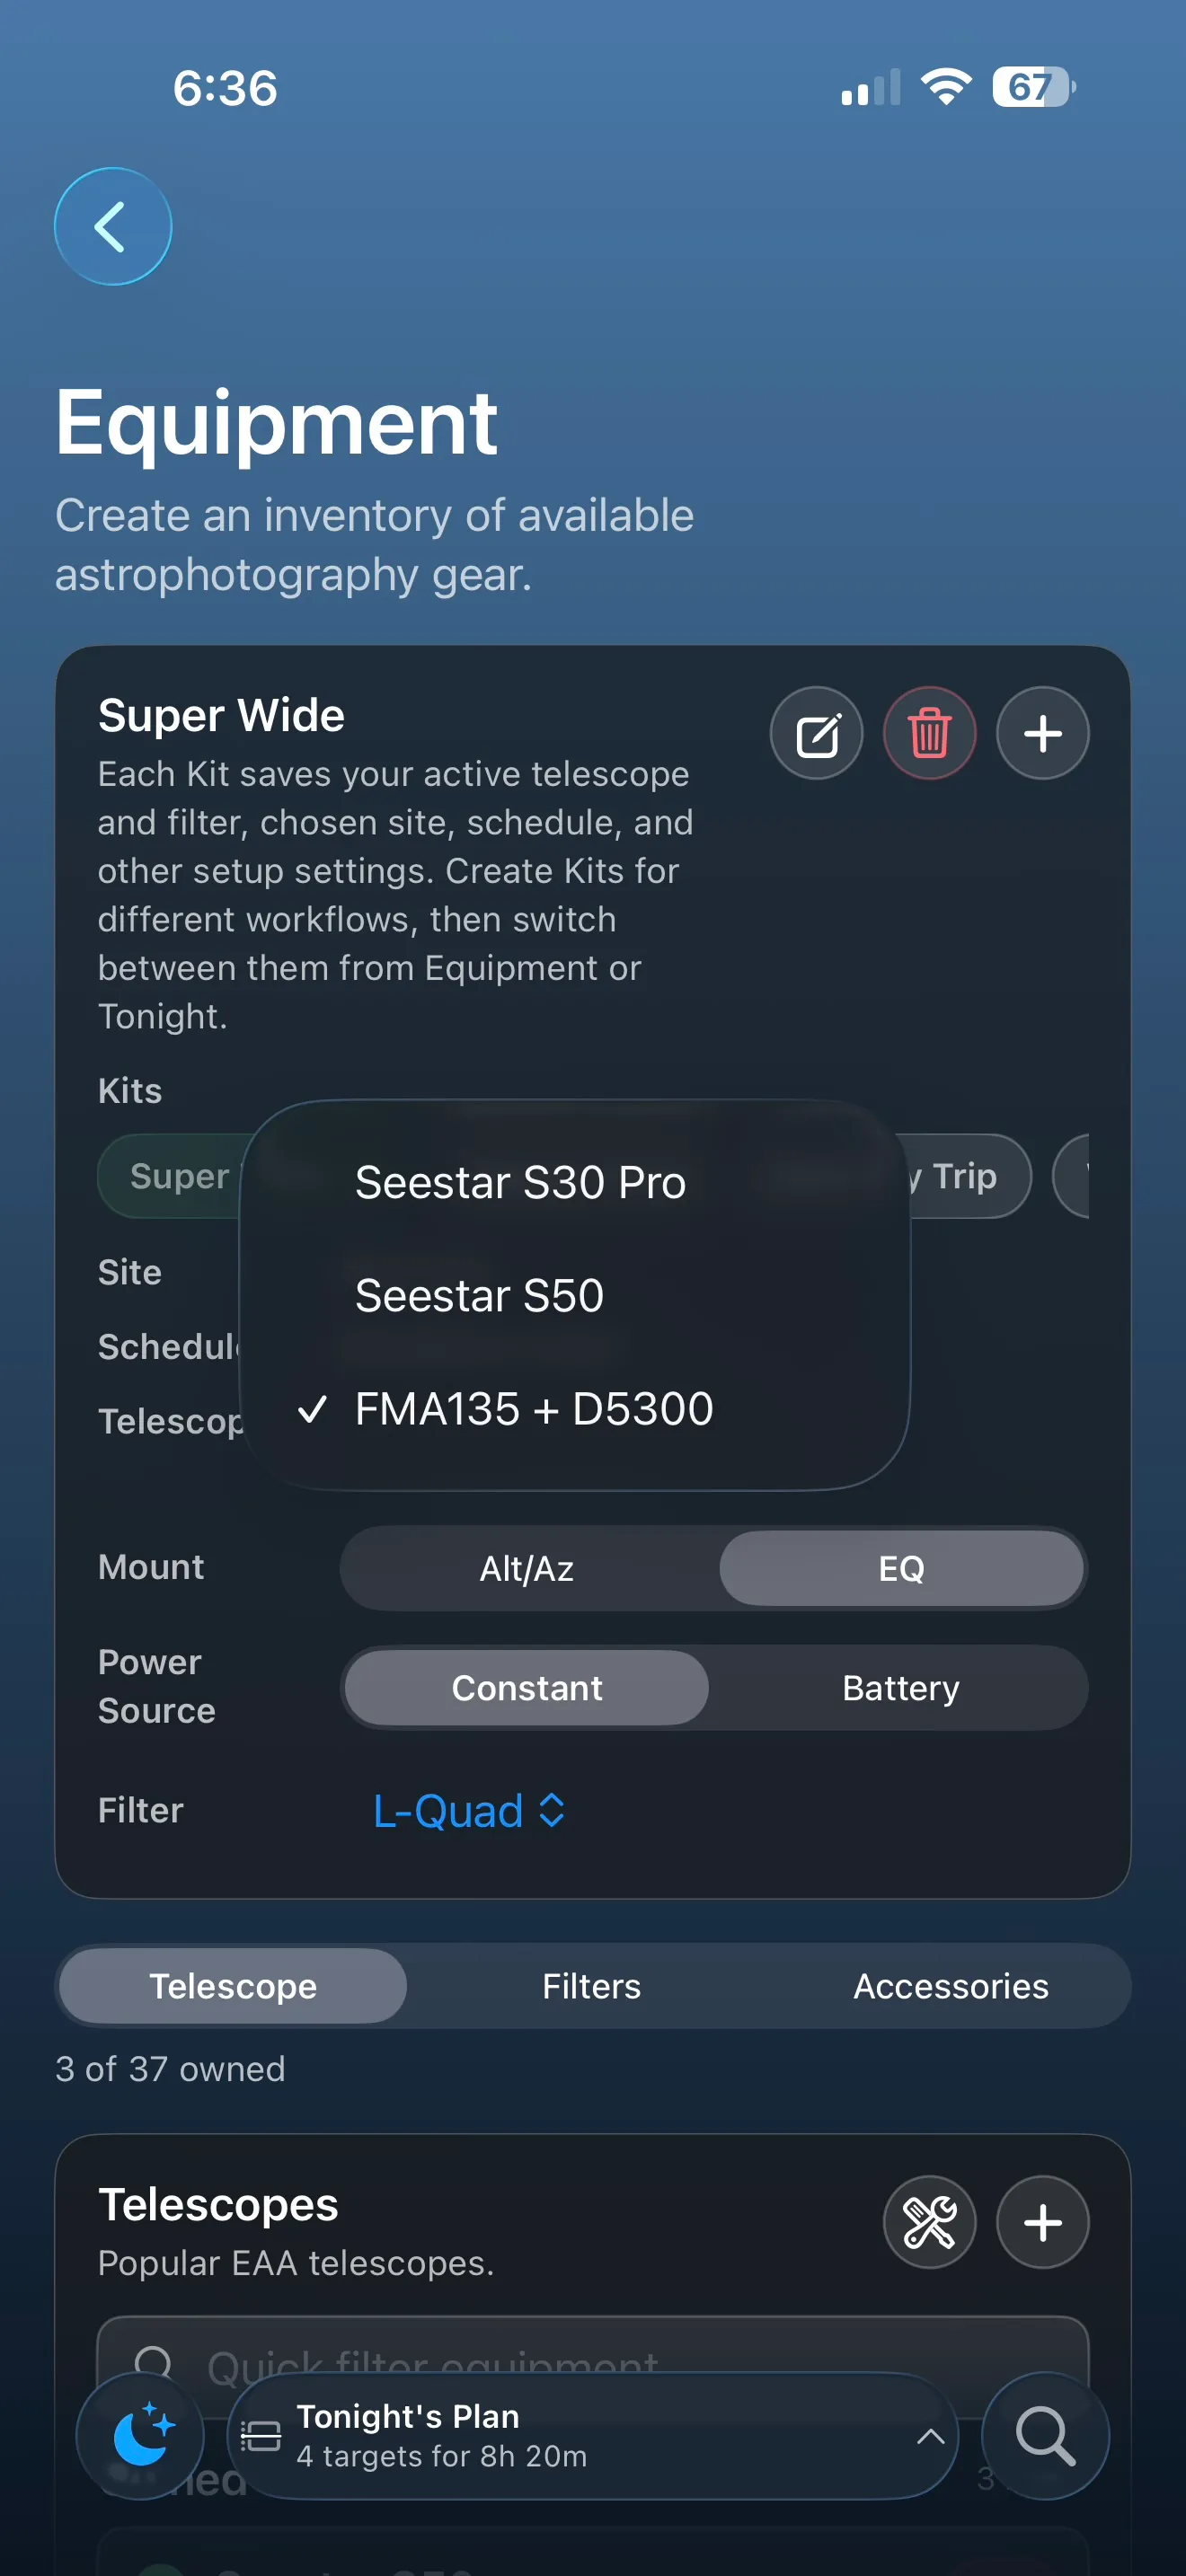
AstroGuide lets you build and preview an imaging rig in the Workshop. Saving that rig into Equipment and using it across planning tools is an AstroGuide Pro capability.
That boundary is meant to keep exploration approachable while making saved custom rigs part of the Pro equipment workflow.
Existing saved rigs remain usable. If you already created a rig, AstroGuide should continue to let you see and use it, even if your current Pro status changes. The Pro boundary applies to creating, editing, deleting, and saving Workshop rigs, not to taking away equipment you already created.
A Good Way To Use Telescope Workshop
Start with a real question.
For example:
- "Would this reducer help the Rosette Nebula fit better?"
- "Is this small camera too narrow for large nebulae?"
- "Would this setup complement my smart telescope, or mostly duplicate it?"
- "Should I use portrait orientation for this subject?"
- "Is this rig more forgiving for wide-field planning or better for compact detail?"
Then build the rig, review the derived values, compare it with equipment you know, and look at a framing preview.
The Workshop is at its best when it turns unfamiliar equipment specs into a clearer planning choice.
It will not remove all uncertainty from astrophotography. Nothing can. But it can help you understand your setup sooner, make better use of your nights, and feel more confident about why a subject does or does not fit the rig in front of you.